If your drill is chewing Phillips-head screws into shiny metal mushrooms and you’re blaming the “cheap screws” or the “weak drill,” the real problem is almost certainly sitting in your bit holder — wrong profile, wrong size, worn tip, or the wrong clutch setting converting rotational force into cam-out destruction. After 15 years of residential carpentry and furniture assembly across the Midwest, I’ve watched homeowners and even some contractors strip thousands of screws for one simple reason: they treat the bit as an afterthought instead of a precision mating component. In this guide, I’ll show you exactly why screws strip, how the wrong bit profile guarantees failure, and the step-by-step protocol I use to drive every screw flush without a single slip — whether I’m hanging drywall, building a deck, or assembling cabinets.
The Physics of Stripping (Why Screws Become Mushrooms)
Stripping is not “stripping the threads” — that’s a different failure. What most people call stripping is cam-out: the bit rides up and out of the screw head, spinning uselessly and grinding the drive recess into a smooth dome.
| Cause |
What Happens |
Why It Destroys the Screw |
| Wrong bit size |
Bit doesn’t seat fully; wobbles in recess |
Concentrates force on 2 points instead of 4; grinds flats |
| Worn bit tip |
Rounded corners can’t grip recess walls |
Slips on every rotation; turns the drive recess into a cone |
| Too much speed, too little pressure |
Bit bounces in the recess |
Hammering action rounds the recess instead of driving |
| Hardwood / dense material without pilot hole |
Screw binds; drill keeps turning |
Bit slips as torque exceeds grip; screw head melts |
| Wrong drive profile |
Phillips bit in JIS or Pozidriv screw |
Close but not exact; angles mismatch and cam-out is designed in |
The critical insight: Phillips screws were actually designed to cam out at a specific torque to prevent assembly-line workers from over-tightening in the 1930s. If you’re using a Phillips bit in a Phillips screw and it keeps camming out, that’s not a defect — it’s the screw working as designed. The solution is either more pressure, a better bit, or a different drive system entirely.
The Bit Profile Problem (Phillips vs. JIS vs. Square vs. Torx)
Not all cross-head screws are Phillips. Using the wrong bit for the recess is the #1 cause of stripping.
| Drive Type |
Visual Identification |
Common Uses |
Bit Compatibility |
Cam-Out Resistance |
| Phillips |
Cross with rounded, tapered corners |
US drywall, general construction, wood screws |
Phillips #1, #2, #3 |
Low (designed to cam out) |
| JIS (Japanese Industrial Standard) |
Cross with sharp, 90-degree corners |
Japanese machinery, some import tools, motorcycles |
JIS bit only; Phillips looks close but fails |
Medium |
| Pozidriv |
Cross with extra small ribs between main slots |
European hardware, some cabinetry |
Pozidriv bit only; Phillips will strip |
Medium-High |
| Robertson (Square) |
Square recess, tapered walls |
Canadian construction, decking, some US trim |
Square #1, #2, #3 |
High |
| Torx (Star) |
6-point star recess |
Automotive, machinery, premium decking, electronics |
Torx T10, T15, T20, etc. |
Very High |
| Hex (Allen) |
6-sided recess |
Furniture, machinery, some modern hardware |
Hex key or bit |
Very High |
Pro tip from the field: I buy Torx-head construction screws whenever possible. The bit engagement is so positive that you can drive them one-handed without the bit slipping. For drywall, I use Phillips #2 with a magnetic dimpler, but I replace the bit every 500 screws. For deck building, I use square-drive or Torx structural screws exclusively.
The Worn Bit Epidemic (The $2 Fix)
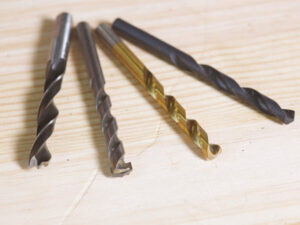
A new Phillips #2 bit has sharp, square corners that grip the screw recess walls. After 100–200 screws, those corners round over. The bit still looks fine to the naked eye, but under magnification, it’s a smooth cone.
The test: Hold a new bit and your used bit side by side. If the tip of the used bit is visibly rounded or polished shiny, it’s done. Throw it away.
The cost: A bulk pack of 10 Phillips #2 bits costs $8–$12. That’s $1 per bit. If you’re stripping screws with a worn bit, you’re destroying $0.10 screws and wasting hours of frustration to save $1.
My rule: I replace my primary Phillips #2 bit every Monday morning on active job sites. For homeowners, replace the bit at the start of every major project.
Clutch and Speed Settings That Prevent Stripping
| Material / Task |
Clutch Setting |
Speed |
Pressure |
Pilot Hole? |
| Drywall to wood studs |
5–7 on drill clutch |
High |
Moderate |
No |
| Hardwood (oak, maple) |
10–15 + pilot hole |
Low |
Heavy |
Yes, 1/16 smaller than screw |
| Softwood (pine, cedar) |
5–8 |
Medium |
Moderate |
Optional |
| MDF / particleboard |
3–5 |
Low |
Light |
Yes, prevents splitting |
| Metal studs / sheet metal |
Drill mode (no clutch) + thread-forming bit |
Low |
Heavy |
Self-tapping |
| Machine screws in metal |
Driver mode, low clutch |
Low |
Heavy |
N/A |
The clutch is your insurance policy. The clutch setting determines how much torque the drill applies before disengaging. If the screw head strips before the clutch slips, your clutch is too high or your bit is wrong.
Technique: Pressure, Angle, and Pilot Holes
Pressure
You must apply firm, steady axial pressure — pushing the drill straight into the screw. If you let up for a millisecond, the bit cams out. This is especially true at the final seating moment when the screw head meets the material surface.
Angle
The drill must be perfectly collinear with the screw. If you’re 5 degrees off-axis, the bit rides up the high side of the recess and strips the opposite wall. This is why right-angle drill attachments exist for tight spaces.
Pilot Holes
In hardwood, dense softwood, or near board edges, a pilot hole is non-negotiable.
-
Diameter: 1/16 inch smaller than the screw shank (not the threads).
-
Depth: Slightly deeper than the screw length.
-
Countersink: For flat-head screws, a countersink bit creates a seat and prevents the head from splitting the surface.
The hardwood exception: If you’re driving into oak or maple and the screw binds, the torque required to turn the screw exceeds the bit’s grip. The bit slips, and the screw head strips. A pilot hole reduces driving torque by 70%, eliminating the stripping risk.
FAQ
Q: Why do drywall screws strip so easily? A: Drywall screws are made of brittle, high-carbon steel with aggressive threads. Their Phillips recess is shallow. Combine that with a worn bit, high speed, and the paper-and-gypsum dust that lubricates the recess, and you have a stripping machine. Use a magnetic dimpler bit, replace it often, and use a clutch setting of 5–7.
Q: Should I use an impact driver instead of a drill for screws? A: For structural work, decking, and long lag bolts, yes. The impact mechanism delivers torque in pulses, reducing cam-out. For delicate trim, cabinetry, and drywall, no — the impacts can over-drive and destroy the material. A drill with a clutch is better for finesse work.
Q: What is the best bit for deck screws? A: Torx (star) or square (Robertson). Both have deep, positive engagement that resists cam-out. If your deck screws came with a cheap Phillips bit, throw it away and buy high-quality Torx or square bits. The time savings on a 500-screw deck is enormous.
Q: Can I remove a stripped screw? A: Yes. For partially stripped Phillips or flat-head screws, press down hard with a manual screwdriver while turning slowly — the pressure can sometimes re-engage the bit. For fully stripped heads, use screw extractor pliers (VamPLIERS or similar), a rubber band over the bit for grip, or a dedicated screw extractor bit. If the screw is in wood and not load-bearing, you can also cut a slot with a Dremel and use a flat-head screwdriver.
Q: Why do my cabinet screws keep stripping? A: Cabinet screws are often #6 or #8 with small heads in hardwood or MDF. Use a fresh bit, reduce clutch to 3–5, and drill a pilot hole. If you’re assembling RTA (ready-to-assemble) furniture, the included screws are often low-grade zinc with shallow recesses — consider replacing them with better screws from the hardware store.
Q: Does bit length matter? A: Yes. A 1-inch bit is too short for deep pockets; the drill chuck hits the material before the screw is seated. A 3–4 inch bit gives clearance but can wobble. Use a 2-inch bit for general work, and a 6-inch extension only when necessary. For precise work, a bit holder with a magnetic collar and depth stop prevents over-driving.
Q: Can I use a drill to drive screws into concrete? A: Only if you’re using concrete screws (Tapcon-style) and have pre-drilled with a masonry bit to the correct depth. The screw threads cut into the concrete. Do not attempt to drive a wood screw into concrete — it will strip instantly and destroy the bit. If you’re doing masonry or patio work, my guide on
the right way to mix concrete by hand for small patio repairs covers the material side of hardscape projects where proper fastening becomes critical.
Conclusion
Stripping screws is not a mystery and it’s not bad luck. It is the predictable result of a worn bit, a mismatched profile, excessive speed, insufficient pressure, or a missing pilot hole in dense material.
Match the bit to the screw. Replace bits before they round. Use Torx or square drive when you have the choice. Set the clutch to slip before the screw strips. Apply steady, straight pressure. Drill pilot holes in hardwood. And stop blaming the screws — they’re usually fine.
About the author: I’m a residential carpenter and assembly specialist with 15 years of hands-on experience driving thousands of screws per week in trim, cabinetry, decking, and furniture across the Midwest. I write detailed tool guides so homeowners can stop stripping screws and start building with confidence — one fresh bit at a time.