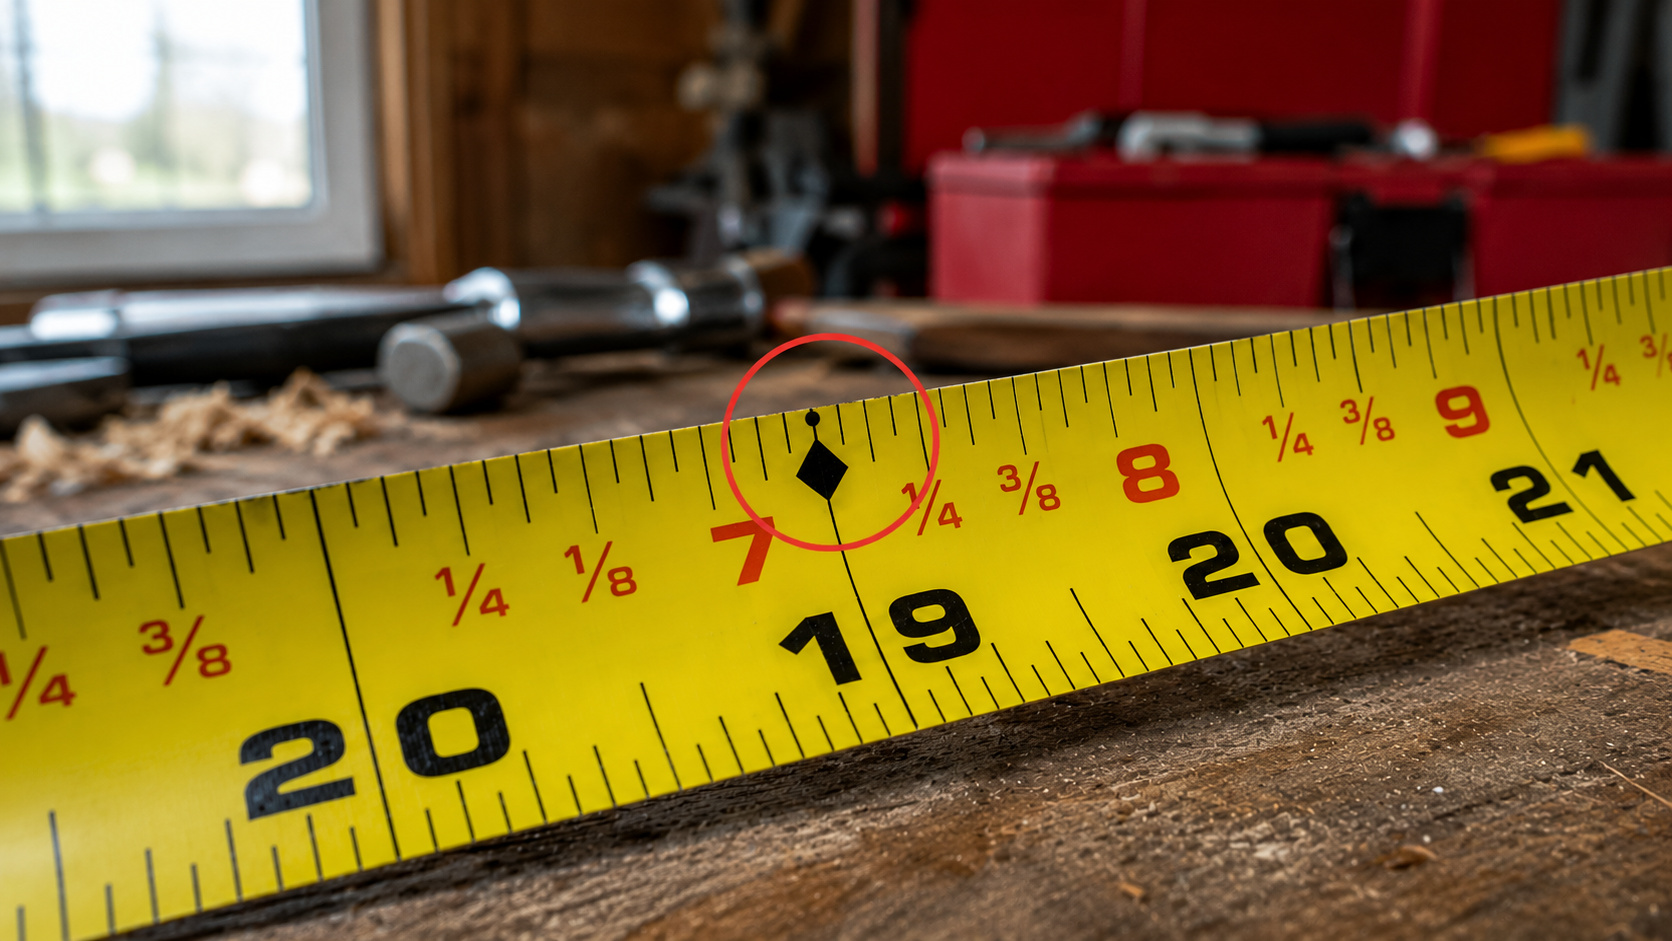
If you’ve been measuring twice and cutting once but still ending up with boards that are a quarter-inch short, the problem isn’t your saw — it’s almost certainly how you’re reading the tape, how you’re accounting for the hook, and what those mysterious black diamonds and red numbers actually mean. After 17 years of framing, trim carpentry, and finish work across the Southeast, I’ve watched homeowners and apprentices misread tape measures thousands of times, usually by trusting the wrong mark or ignoring the hook’s built-in play. In this guide, I’ll show you exactly how to read every mark on a standard tape measure, why the first inch is often subdivided differently than the rest, what those little black diamonds mean for 19.2-inch framing, and the technique I use to ensure my “cut on the line” measurements are accurate to 1/32 of an inch every single time.
The Anatomy of a Tape Measure (What Every Mark Means)
A standard 25-foot tape measure is a precision instrument disguised as a pocket tool. Every mark has a purpose.
| Feature |
Location |
Purpose |
| Hook |
End of blade |
Catches edge for outside measurements; slides for inside measurements |
| Rivets |
Attach hook to blade |
Allow the 1/16-inch slide movement |
| Blade markings |
Every 1/16 inch |
Primary fractional measurement |
| Long vertical lines |
Every 1/8, 1/4, 1/2, 1 inch |
Major fraction demarcation |
| Red numbers |
Every 16 inches |
Stud layout marks (16-inch on-center) |
| Black diamonds |
Every 19.2 inches |
Engineered joist/truss layout (5 per 8-foot sheet) |
| Foot marks |
Every 12 inches |
Whole-foot indicators (often red number or arrow) |
| Blade width |
Typically 1 inch |
Allows the tape to span 8 feet without collapsing when extended |
How to Read Fractions on the Tape (The Color Code)
Standard tapes use a consistent visual hierarchy to help you read fractions quickly without counting tiny lines.
| Mark Type |
Length |
Represents |
| Shortest line |
1/16 inch mark |
1/16 of an inch |
| Medium line |
1/8 inch mark |
2/16 (1/8) |
| Medium-long line |
1/4 inch mark |
4/16 (1/4) |
| Long line |
1/2 inch mark |
8/16 (1/2) |
| Longest line + number |
Whole inch |
1, 2, 3… |
The reading method:
-
Find the nearest whole inch to the left of your measurement point.
-
Count the number of 1/16-inch marks past that inch.
-
Reduce the fraction:
-
2 marks = 2/16 = 1/8
-
4 marks = 4/16 = 1/4
-
6 marks = 6/16 = 3/8
-
8 marks = 8/16 = 1/2
-
10 marks = 10/16 = 5/8
-
12 marks = 12/16 = 3/4
-
14 marks = 14/16 = 7/8
Pro tip from the field: I never count individual 1/16 marks past 1/2 inch. I find the nearest 1/4 or 1/2 mark and count 1 or 2 marks from there. It’s faster and less error-prone. For example, instead of counting 11 marks from the inch line, I find the 3/4 mark (12 marks) and step back one mark to 11/16.
The Hook Slip: Why the First 1/16 Inch Is Supposed to Move
The hook on the end of your tape measure slides back and forth by exactly 1/16 inch. This is not a defect. It is a precision compensation feature.
Outside measurement (pulling): When you hook the tape onto the edge of a board and pull, the hook slides out. The measurement starts from the inside face of the hook.
Inside measurement (pushing): When you push the tape measure against an inside corner (like the inside of a window frame), the hook slides in. The measurement starts from the outside face of the hook.
The result: The 1/16-inch movement cancels out the thickness of the hook itself, giving you a true reading in both scenarios.
The test: Press the hook against a flat surface. It should slide in smoothly with no slop beyond 1/16 inch. If it moves more than that, or if the rivets are loose, your tape is inaccurate and should be replaced.
The Black Diamonds: 19.2-Inch Framing Layout
Every 19.2 inches on your tape measure, you’ll see a small black diamond. These are not decorative. They are engineered joist and truss layout marks.
The math: 8 feet = 96 inches. 96 ÷ 5 = 19.2 inches.
By placing five joists or trusses per 8-foot sheet of plywood or OSB subflooring, you eliminate the need to cut the last sheet. Each sheet breaks perfectly on a joist.
| Layout System |
Spacing |
Joists per 8-Foot Sheet |
Waste / Cuts |
| 16-inch on-center |
16 inches |
6 joists + rim |
Last sheet must be cut to fit |
| 19.2-inch on-center |
19.2 inches |
5 joists + rim |
Full sheets break on joists; zero waste |
| 24-inch on-center |
24 inches |
4 joists + rim |
Requires thicker subfloor; more bounce |
When to use 19.2: Floor joists and roof trusses in production framing where material efficiency matters. When not to use it: walls (always 16-inch OC for drywall alignment), and any floor where you want maximum stiffness (stick with 16-inch OC).
The Red Numbers: 16-Inch On-Center Stud Marks
The red numbers and arrows every 16 inches are the most commonly used marks on a tape. They indicate 16-inch on-center stud layout, which is the standard for wall framing in North America.
Why 16 inches?
-
Drywall and plywood sheets are 4×8 feet (48×96 inches).
-
48 ÷ 16 = 3 studs per sheet width.
-
96 ÷ 16 = 6 studs per sheet length.
-
This means every sheet edge breaks on a stud or joist, providing full support and minimal waste.
How to use them: Instead of measuring 16, 32, 48, 64, 80, 96 inches from the end of the wall, simply use the red marks. Hook the tape on the end stud, mark at the first red number (16), then mark at every subsequent red number. This is faster and eliminates cumulative error.
Measuring Inside vs. Outside (The 90-Degree Trick)
Inside measurements (window openings, between studs, inside a door frame) are where most errors occur because the tape body gets in the way.
The 90-degree trick:
-
Place the tape measure inside the opening.
-
Bend the tape at 90 degrees where it meets the edge of the opening.
-
Read the measurement at the bend point.
The body-add method: A standard 1-inch wide tape measure body is often exactly 3 inches long (check yours — many are 3 inches from the back of the body to the hook face). To measure an inside dimension:
-
Place the hook against one inside face.
-
Lay the tape body against the opposite inside face.
-
Read the measurement at the tape body end, then add 3 inches.
Always verify your tape body length. It is often printed on the case: “3 INCH CASE LENGTH.” If not, measure it once and write it on the case with a Sharpie.
FAQ
Q: Why is the first inch on some tape measures divided into 32nds? A: The first 6 or 12 inches often have 1/32-inch markings for precision layout work, especially in trim carpentry where you need to mark exact centers or offsets without moving the tape. Past the first foot, the marks usually drop to 1/16-inch for readability.
Q: My tape measure hook is loose. Is it broken? A: It should move exactly 1/16 inch. If it moves more, or if it wobbles side-to-side, the rivets are worn and the tape is no longer accurate. Replace it. A $15 tape measure is cheaper than a ruined $80 sheet of plywood.
Q: Can I trust the black diamonds for wall studs? A: No. Walls are framed at 16-inch on-center (red numbers) because drywall is sized for 16-inch and 24-inch spacing. The 19.2-inch diamonds are for floor joists and roof trusses only. Using 19.2 on walls will leave your drywall unsupported at every seam.
Q: Why does my tape measure have a hole in the hook? A: The hole is for hooking onto the head of a nail or screw when you’re measuring alone. Drive a finish nail at your starting point, hook the hole over it, and pull your measurement. This is especially useful for long diagonal measurements.
Q: How do I measure accurately if the tape measure blade is bent? A: A bent blade near the hook is common after drops. The first 6–12 inches may read incorrectly. For critical measurements, start from the 10-inch mark instead of the hook. Measure your piece, then subtract 10 inches from the reading. This bypasses the bent section entirely.
Q: What’s the difference between a standard tape and a masonry tape? A: Masonry tapes often have a longer, more robust hook designed to catch on block edges, and the blade may have a more abrasive-resistant coating. For wood framing and general DIY, a standard 25-foot tape with a 1-inch blade is ideal.
Q: Can I use a tape measure for laying out tile? A: Yes, but for precise tile layout, a combination square or a dedicated tile layout tool is often more accurate because the tape hook can slip on smooth surfaces. For large format tile or backsplash layout, I often use the tape for rough measurements and a rigid ruler or story stick for the final layout marks. If you’re working on a tile project, the precision measurement principles here pair directly with the installation techniques I cover in
how to install a backsplash using peel-and-stick tile that lasts — accurate layout is what makes the difference between a professional finish and a crooked mess.
Q: Why are some tape measures 25 feet and others 30 feet? A: 25 feet is the standard for framing and general carpentry. 30 or 35 feet is useful for concrete form work, large decks, and site layout. For most homeowners, a 25-foot tape is sufficient and less bulky in the hand.
Q: Should I buy a tape measure with fractional markings printed on it? A: Tapes with the fractions printed next to the marks (e.g., “1/4” written above the line) are excellent for beginners and for anyone who struggles to reduce fractions quickly. They are not “cheating” — they are a speed tool. Professional carpenters often prefer clean tapes without printed fractions because the text clutters the view during fast layout.
Conclusion
A tape measure is the most-used tool on any job site, and it is the source of more expensive errors than any saw or drill. The difference between a perfect fit and a gap you have to caulk is usually 1/16 inch — one mark on the tape.
Read the colors. Short, medium, long. Find the nearest whole inch, count the marks, reduce the fraction. Understand that the hook moves 1/16 inch on purpose. Use the red numbers for studs. Use the black diamonds for joists. Add the case length for inside measurements. And when the hook gets sloppy, throw the tape away and spend $15 on accuracy.
About the author: I’m a framing and finish carpentry specialist with 17 years of hands-on experience laying out walls, cutting trim, and mentoring apprentices in the art of the tape measure across the Southeast. I write detailed tool guides so homeowners and new DIYers can stop miscutting expensive lumber and start building with the confidence that comes from reading every mark correctly — including those little black diamonds.