Why Container Plants Freeze Faster Than In-Ground Plants (The Physics)
Container plants are not just “plants in pots.” They are plants in an entirely different thermal environment than their in-ground counterparts. Understanding this difference determines which protection method you choose.
The Three Thermal Disadvantages
| Factor |
In-Ground Plant |
Container Plant |
Why It Matters |
| Soil volume |
Virtually unlimited; roots extend deep into subsoil |
Limited to 1–20 gallons; root ball is shallow and narrow |
Small soil mass freezes solid faster than large ground mass |
| Insulation |
Surrounded by earth on all sides; soil is a poor conductor of heat |
Exposed to air on all sides; thin plastic or ceramic walls transmit cold rapidly |
Roots lose heat 360 degrees instead of just from the top |
| Thermal mass |
Deep soil stores daytime heat and releases it slowly overnight |
Potting mix is lightweight, porous, and dries out — losing thermal mass |
A dry root ball can drop to air temperature within 2 hours of sunset |
The critical insight: A 28°F frost that barely touches your in-ground perennials can kill a container plant outright because the entire root zone freezes solid. In-ground plants have roots below the frost line. Container plants have roots at the frost line.
The “Dry Pot” Death Spiral
Potting mix is designed to drain well — it’s mostly peat, coir, perlite, and bark. These materials are excellent for root health but terrible for heat retention. When potting mix dries out (as it does in spring or early fall between waterings), it loses its last thermal buffer: water. A dry pot freezes at 32°F. A moist pot resists freezing until 28°F or lower because water must release latent heat as it turns to ice.
This is why your first action when a frost is forecast is always: water thoroughly.
The 10-Minute Frost Warning Protocol (What to Do First)
When you get the alert, you have limited time. Here’s the priority sequence I use when a freeze warning hits my nursery:
Minute 0–2: Check the Forecast Details
-
Temperature: How low? 32°F damages tender growth. 28°F kills most tropicals. 24°F kills hardy perennials in containers.
-
Duration: 2 hours at 30°F is different from 6 hours at 26°F.
-
Wind: Clear, still nights are the coldest (radiational cooling). Windy nights mix air layers and are often less damaging.
-
Sky: Clear skies allow heat to radiate into space. Cloudy nights trap heat.
Minute 2–5: Water Everything
Run a hose and soak every container until water drains from the bottom. This is your single highest-impact action. Moist soil holds 4–5 times more heat than dry soil.
Minute 5–10: Move What You Can
Tropicals, succulents, and tender annuals move first. If you have a garage, shed, or even a covered porch, relocate the most vulnerable plants. Even an unheated garage rarely drops below 40°F if the door stays closed.
Pro tip from the field: I keep a wheeled plant dolly under my largest containers for exactly this reason. A 25-gallon pot weighs 80+ pounds when wet. Without wheels, you won’t move it when panic strikes.
Method 1: The Cluster-and-Blanket Strategy (Best for Multiple Pots)
This is my go-to method when I have 10+ containers and no indoor space. It works by creating a microclimate where the plants protect each other.
Step 1: Cluster Tightly
Push all containers together in the tightest grouping possible, preferably against a south-facing wall or the foundation of your house. The wall absorbs daytime heat and radiates it back at night. The foundation mass never freezes and acts as a thermal anchor.
Step 2: Inner Circle, Outer Circle
Place the most tender plants in the center of the cluster. Place hardy plants (evergreens, dormant perennials) on the outer ring as wind and frost buffers.
Step 3: Blanket the Mass
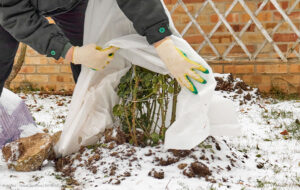
Drape old blankets, comforters, drop cloths, or frost blankets over the entire cluster. Do not wrap individual pots — you want to trap a pocket of air around the foliage and stems.
Secure the edges: Use bricks, pots, or landscape staples to anchor the blanket to the ground. If the wind lifts the blanket at 2 AM, the protection is gone.
Step 4: Remove in the Morning
As soon as temperatures rise above 35°F and the sun hits the cluster, pull the blankets back. Trapped moisture and heat can cook plants or promote fungal growth if left covered all day.
Why this works: The cluster reduces exposed surface area by 60–70%. The shared trapped air warms from soil heat and plant respiration. The wall radiates stored heat. I’ve seen this method keep container soil 8–12°F warmer than ambient air on a 28°F night.
Method 2: The Bubble Wrap Insulation Method (Best for Single Specimens)
For a single prized container — a Japanese maple in a ceramic pot, a large citrus, or a topiary — bubble wrap provides excellent insulation without the bulk of blankets.
Step 1: Wrap the Pot, Not the Plant
Wrap the container itself in 2–3 layers of large-bubble bubble wrap (1/2-inch bubbles or larger). Secure with packing tape. This insulates the root ball, which is the part you must save. Roots can tolerate 25°F if the pot is insulated; exposed roots in thin plastic freeze at 30°F.
Step 2: Cover the Foliage
Drape a lightweight frost blanket or bedsheet over the plant canopy. Do not use plastic sheeting directly on leaves — it conducts cold and traps moisture that freezes to the foliage.
Step 3: The Thermal Cap
Place a piece of cardboard or a flat paver stone on top of the soil surface inside the pot rim, under the wrap. This creates a “thermal cap” that prevents heat from escaping upward through the soil.
My proprietary field trick: For ceramic pots that are already glazed and fragile, I slip the pot into a contractor trash bag first, then wrap the bag with bubble wrap. The bag prevents moisture from getting between the wrap and the pot, which would freeze and expand, potentially cracking the ceramic.
Method 3: The Garage Overnight Method (Best for Tropicals and Succulents)
If you have a garage, shed, or unheated sunroom, this is the most reliable protection for tender plants.
Step 1: Move Early
Don’t wait until 10 PM. Move plants in the late afternoon while temperatures are still above 50°F. Sudden temperature shocks (from 70°F house to 40°F garage) are less stressful than gradual frost exposure, but moving them while they’re warm reduces transplant shock.
Step 2: Group by Water Needs
Tropicals (ferns, philodendrons, citrus) need humidity. Succulents need dryness. Don’t crowd them in the same dark corner. Place tropicals on a tray of moist pebbles. Place succulents on a dry shelf near a window.
Step 3: Minimal Water in the Garage
Plants in dark, cool garages don’t photosynthesize and don’t use water. A soggy pot in a dark garage rots. Water only if the soil is dry to the second knuckle.
Step 4: Return Gradually
After the frost passes, don’t move plants directly back into full sun. Place them in shade for 2–3 days first. The sudden light intensity after garage dimness can scorch leaves that are already frost-stressed.
Warning: If your garage drops below 35°F consistently, this method fails for true tropicals. Consider adding a small space heater on a thermostat set to 40°F, or use Method 5 for those specimens.
Method 4: The Water Thermal Mass Trick (Best for Fruit Trees and Large Containers)
For containers too large to move or wrap (citrus trees, figs, dwarf fruit trees), water provides thermal mass that buffers temperature swings.
Step 1: The Milk Jug Method
Fill 1-gallon milk jugs with water and place them around the base of the container, touching the pot walls. The water in the jugs freezes at 32°F, releasing latent heat as it does so. This heat transfer keeps the root ball marginally warmer.
Step 2: The Pond Liner Method
For very large containers, line the base and sides with a black contractor trash bag filled with water. The black color absorbs daytime heat, and the water mass (10–20 gallons) provides significant thermal buffering.
Step 3: Combine with Blanket
The water mass alone won’t save a plant at 24°F. Combine it with the cluster-and-blanket method: push the water jugs against the pot, cluster other pots around it, and drape blankets over the entire assembly.
Field reality: On a 26°F night, I’ve measured soil temperature in a 15-gallon citrus pot surrounded by water jugs and under a blanket at 34°F — 8 degrees warmer than ambient. The water jugs froze solid by morning, but the root ball never did.
Method 5: The Heat Cable and Mini-Greenhouse Approach (Best for Extended Cold)
If the forecast calls for multiple nights below freezing, passive methods may not be enough.
Step 1: The PVC Hoop House
Build a mini-hoop house over your container cluster using 1/2-inch PVC conduit bent into hoops and pushed into the ground or weighted pots. Cover with 6-mil greenhouse plastic.
Step 2: Add Heat
Wrap a soil heating cable (available at garden centers) around the base of your most vulnerable pots, under the plastic. Set it on a thermostat or timer to run from sunset to sunrise. A 50-foot cable draws about 60 watts and can keep a 4×6-foot microclimate above freezing.
Step 3: Monitor Humidity
Greenhouse plastic traps moisture. On sunny days, open the ends or lift the plastic to prevent condensation that promotes mold. On cold nights, seal it completely.
Cost note: A soil heating cable costs $40–$60. PVC and plastic for a mini-hoop house costs $30–$50. For a collection of $200+ container specimens, this is cheap insurance. For a single $15 petunia, use Method 1.
What NOT to Do (Common Mistakes That Guarantee Plant Death)
| Mistake |
Why It Fails |
The Correct Action |
| Wrapping leaves in plastic sheeting |
Plastic conducts cold to foliage; trapped moisture freezes directly on leaves |
Use breathable fabric (sheet, blanket, frost cloth) |
| Moving plants indoors to a heated house |
Temperature shock + dry indoor air + lack of light = leaf drop and death within days |
Move to unheated garage or sunroom; keep above 40°F, not 70°F |
| Watering with hot water |
Thermal shock kills root hairs; hot water can cook roots |
Use ambient-temperature water; soak thoroughly hours before frost |
| Covering with blankets and leaving them for days |
Trapped humidity causes botrytis and other fungal rots; no light causes etiolation |
Remove covers as soon as temperatures rise above 35°F |
| Placing plants directly on concrete floors in garage |
Concrete pulls heat from pots; roots freeze from the bottom up |
Elevate on pallets, boards, or folded cardboard |
| Pruning frost damage immediately |
Pruning stimulates new growth that is even more vulnerable to the next freeze |
Wait until all frost danger has passed and new growth begins |
Post-Frost Recovery: Assessing Damage and Pruning Correctly
The morning after a frost, your plants may look terrible. Don’t panic — and don’t grab the pruners yet.
Step 1: The Thaw Assessment
Wait until the plant has fully thawed (midday) before touching it. Frozen cell walls are brittle. Moving or bending frozen stems ruptures cells that might have survived.
Step 2: The Scratch Test
Use your fingernail to gently scratch the bark or stem of woody plants. Green tissue underneath means the stem is alive. Brown or black tissue means that section is dead.
For herbaceous plants, check the crown (where stems meet soil). If the crown is firm and green, the plant will likely resprout even if all foliage is blackened.
Step 3: Wait to Prune
Do not prune until:
-
All danger of frost has passed (check your local last frost date)
-
New growth begins to emerge from surviving tissue
-
You can clearly distinguish dead wood from living wood
Pruning too early stimulates tender new growth that will be killed by the next cold snap. In my nursery, I often wait 4–6 weeks after a late frost before pruning woody container specimens.
Step 4: The Recovery Feed
Once new growth appears, feed with a half-strength liquid fertilizer (fish emulsion or seaweed extract). The plant is stressed; full-strength fertilizer burns compromised roots. Focus on root health, not top growth.
FAQ
Q: Will a light frost at 32°F kill my container tomatoes and peppers? A: Probably not immediately, but it will damage tender new growth and flowers. Tomatoes and peppers are tropical perennials treated as annuals. At 32°F, foliage may blacken. At 28°F, the plant is likely dead. If frost is forecast, harvest all fruit and move containers to a garage or cover them with the cluster-and-blanket method.
Q: Can I use Christmas lights to keep my containers warm? A: Old-style incandescent Christmas lights (C7 or C9 bulbs) generate meaningful heat and can raise temperatures under a blanket by 3–5°F. LED lights do not generate enough heat to matter. Wrap the lights around the pots (not the foliage) and cover with a blanket. Test the setup before the frost night to ensure the bulbs don’t touch fabric directly.
Q: How do I know if my container plant is dead or just dormant after a freeze? A: Wait 2–3 weeks. Scratch the bark or check the crown. Many plants that look completely dead will resprout from the base. Hydrangeas, figs, and roses routinely die back to the crown in containers and regrow vigorously. Patience is your best tool.
Q: Should I fertilize before a frost to “strengthen” the plant? A: No. Nitrogen stimulates soft, sappy growth that is more susceptible to freeze damage. Stop fertilizing 2 weeks before your average last frost date in spring. Resume only after the frost danger has passed and new growth is active.
Q: Can I leave my containers on a covered porch and skip protection? A: A covered porch protects against radiational cooling from the sky but not against ambient air temperature. If it’s 28°F outside, it’s 28°F on your porch. The roof may keep frost from forming on leaves, but the air temperature alone can freeze the root ball. Use the bubble wrap method on the pots at minimum.
Q: My ceramic pot cracked after a freeze. Can I prevent this? A: Ceramic and terracotta pots absorb water into their walls. When that water freezes, it expands and cracks the pot. Empty saucers before freezing nights (trapped water freezes and cracks the pot from below). Wrap ceramic pots in bubble wrap or burlap to insulate the walls. In very cold climates, switch to frost-proof resin, wood, or thick plastic containers for winter.
Q: Is it worth protecting annuals in containers, or should I let them die and replant? A: For a $5 petunia, no. For a custom-planted 20-gallon mixed container that cost $80+ in plants and soil, yes. For sentimental plants (grandmother’s geranium cutting), absolutely. Match your protection effort to the plant’s value and replaceability.
Q: Can I use a space heater in my garage for tropical container plants? A: Yes, but use extreme caution. Only use heaters with tip-over shutoffs and thermostat controls. Keep them away from combustible materials and water. A heater set to 45°F is sufficient for most tropicals. Do not use propane heaters in enclosed spaces — carbon monoxide risk is lethal.
Conclusion
An unexpected late frost doesn’t have to mean a container garden massacre. The key is understanding that container plants are thermally disadvantaged compared to their in-ground cousins, and they need active intervention when temperatures drop below 32°F.
Water first. Moist soil is your cheapest and most effective thermal buffer. Then choose your protection method based on plant value, container size, and available materials: cluster-and-blanket for volume, bubble wrap for prized specimens, garage relocation for tropicals, water mass for immovable trees, and heat cables for extended cold events.
And avoid the common mistakes: plastic sheeting on foliage, heated indoor relocation, premature pruning, and leaving covers on for days. These turn a survivable frost into a guaranteed loss.
The best frost protection is preparation. Keep blankets, bubble wrap, and milk jugs stored near your containers. Install wheeled dollies under large pots before the season starts. Know your garage’s minimum temperature. When the forecast shifts at 6 PM, you’ll be ready instead of panicking.
Last updated: June 2026 | Frost protection procedures reflect current horticultural best practices for container gardening in USDA Hardiness Zones 4–9. Adjust methods based on your specific climate and container materials.
About the author: I’m a container nursery manager and horticultural advisor with 14 years of hands-on experience protecting, overwintering, and recovering container specimens through unexpected weather events across multiple hardiness zones. I write detailed seasonal guides so gardeners can save their investments and enjoy thriving container gardens year after year — without replacing everything after every cold snap.