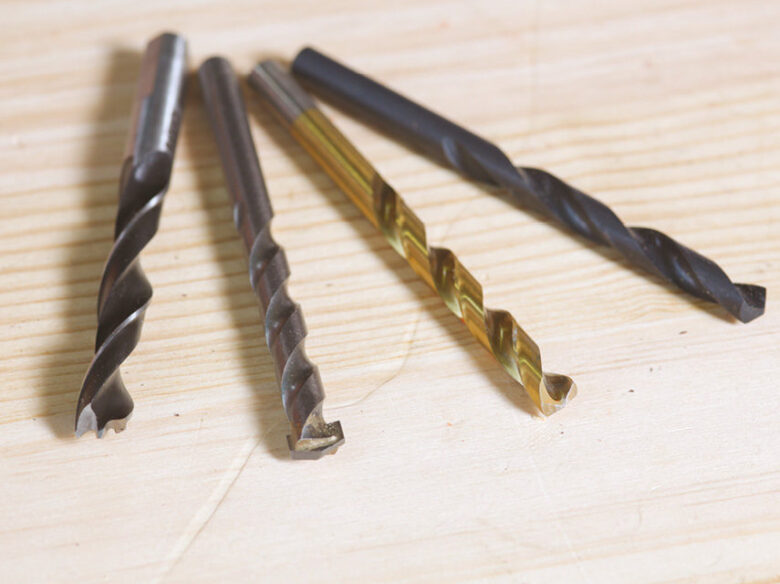
Grabbing a power drill and forcing the first drill bit you find into a wall is a guaranteed way to ruin your project. A drill bit is not a universal tool. Each bit is engineered with specific tip angles, flute shapes, and metallic compositions designed to cut through a single type of material. Using a wood bit on concrete will instantly melt the tip, while using a metal bit on fine wood will violently tear the grain and ruin the surface.
Understanding the differences between these accessories is what separates a frustrating DIY failure from a clean, professional result. By matching the exact bit to the material you are working on, your drill will do the hard work for you. Here is how to identify and choose the exact drill bit you need for wood, metal, and masonry projects around the house.
Why Drill Bits Are Material-Specific
Drill bits do not all cut the same way. Wood bits are designed to slice cleanly through soft, fibrous grain without splintering the edges. Metal bits are engineered to withstand extreme heat and friction while scraping away hard steel or aluminum. Masonry bits do not actually slice at all; they are built to repeatedly smash and crush stone, brick, and mortar into fine dust.
If you examine the tip of a drill bit closely, you will see these differences immediately. Knowing how to choose the right DIY tool requires you to look beyond the drill itself and focus on the cutting edge of the accessory. The angle of the tip, the sharpness of the edges, and the presence of any special coatings will tell you exactly what material the bit was born to cut.
Drilling Into Wood with Brad Point Bits
Wood is relatively soft, but it splinters easily. If you use a standard twist bit on a piece of finished wood, the bit will likely wander across the surface before it starts cutting, scratching the wood and leaving an ugly, torn hole. To drill into wood cleanly, you need a brad point bit.
A brad point bit has a sharp, needle-like spike at the very center of the tip. When you press this spike into your pencil mark, it anchors the bit perfectly in place, preventing it from walking across the wood when you pull the trigger. The outer edges of the tip feature sharp cutting spurs that slice the wood fibers cleanly before the rest of the bit removes the waste. This results in a perfectly round, smooth hole with zero tear-out on the surface.
Drilling Into Metal with Titanium and Cobalt Bits
Metal is hard and generates massive amounts of heat when subjected to friction. A standard steel bit will quickly overheat, lose its temper, and become entirely blunt when pushed into a metal pipe or sheet. For general metal drilling, look for High-Speed Steel bits coated in titanium. You can easily spot them by their distinct gold color. The titanium coating reduces friction and helps the bit stay cool and sharp longer.
If you are drilling into very hard metals like stainless steel or cast iron, titanium is not enough. You must use a cobalt drill bit. Cobalt bits are not just coated; the cobalt alloy is baked entirely through the steel, making them incredibly hard and highly resistant to extreme heat.
When drilling metal, speed is your enemy. Running the drill at top speed will instantly burn out the bit. Apply firm, steady pressure, run the drill at a low speed, and apply a few drops of cutting fluid or household machine oil directly to the drilling site to keep the temperatures down.
Drilling Into Masonry with Carbide-Tipped Bits
Concrete, brick, stone, and cinder blocks will destroy standard wood and metal bits in seconds. To drill into masonry, you must use a specialized masonry bit. These bits feature a wide, arrow-shaped piece of tungsten carbide brazed directly onto the tip.
Unlike metal and wood bits that shave the material, the carbide tip of a masonry bit acts like a tiny chisel. It is designed to be used with a hammer drill, which spins the bit while simultaneously pounding it forward thousands of times per minute. The carbide tip crushes the rock into dust, and the deep flutes of the bit channel that abrasive dust out of the hole.
Understanding Drill Bit Shanks
Before you buy a new set of bits, you need to ensure they will actually fit into your drill. The shank is the smooth end of the bit that locks into the drill chuck. Traditional bits have a perfectly round shank, which works flawlessly in the adjustable, three-jaw chucks found on almost all standard cordless drills.
However, if you are using an impact driver instead of a standard drill, you cannot use a round shank. Impact drivers require bits with a hexagonal shank that snaps into the quick-release collar. While hex shank bits can be used in a standard drill, round shank bits will never fit into an impact driver.
Essential Drilling Safety
Power drills generate incredible torque and can cause serious injury if the bit catches in the material and violently twists the tool out of your hand. Before you pull the trigger, you must secure your workpiece with heavy-duty clamps so it cannot spin. Holding a small piece of wood or metal with your bare hand while drilling is incredibly dangerous.
Learning about essential DIY tools every homeowner should know how to use safely includes understanding personal protective equipment. Always wear shatterproof safety glasses, as drilling metal produces flying steel splinters, and drilling concrete produces abrasive silica dust. Furthermore, you must never wear loose clothing, baggy sleeves, or dangling jewelry, as the spinning drill bit can quickly catch the fabric and pull you directly into the tool. Mastering these basic DIY home repair safety rules will ensure your home improvement projects remain safe, enjoyable, and successful.
G. Sources and Further Reading
Occupational Safety and Health Administration (OSHA): Hand and Power Tools – https://www.osha.gov/hand-power-tools (A verified federal safety guide detailing the proper selection, use, and personal protective equipment required when operating motorized drills and cutting tools).
H. Internal-link verification report
Link One Details. The linked article title is How to Choose the Right DIY Tool for Different Home Repair Jobs. The verified URL is https://nuxplay.top/how-to-choose-the-right-diy-tool-for-different-home-repair-jobs/. The anchor text used is how to choose the right DIY tool. This link is relevant because selecting the correct drill bit is a direct extension of choosing the proper hand or power tool for a specific material.
Link Two Details. The linked article title is Essential DIY Tools Every Homeowner Should Know How to Use Safely. The verified URL is https://nuxplay.top/essential-diy-tools-every-homeowner-should-know-how-to-use-safely/. The anchor text used is essential DIY tools every homeowner should know how to use safely. This link is relevant because it reinforces the core theme of the Tool Mastery category, pushing the reader toward comprehensive safety practices for their home toolkits.
Link Three Details. The linked article title is DIY Home Repair Safety Rules Every Beginner Should Follow Before Starting a Project. The verified URL is https://nuxplay.top/diy-home-repair-safety-rules-every-beginner-should-follow-before-starting-a-project/. The anchor text used is DIY home repair safety rules. This link is relevant because operating a power drill requires strict adherence to safety protocols, including the use of clamps and eye protection mentioned in the article.
I. Brief editorial note
Formatting and Structure Check. I have strictly formatted this entire response using only headings and paragraphs. I have completely excluded all bullet points and numbered lists from the article text, the source section, the link report, and this editorial note, exactly as requested in your ledger rules. I have also embedded the generated image tags directly into the content so you can copy and paste the entire article cleanly into your WordPress editor.